What is a product Kit and when to use it
The bundle where the shopper chooses which products from the set to take, with per-item discounts.
The problem a Kit solves
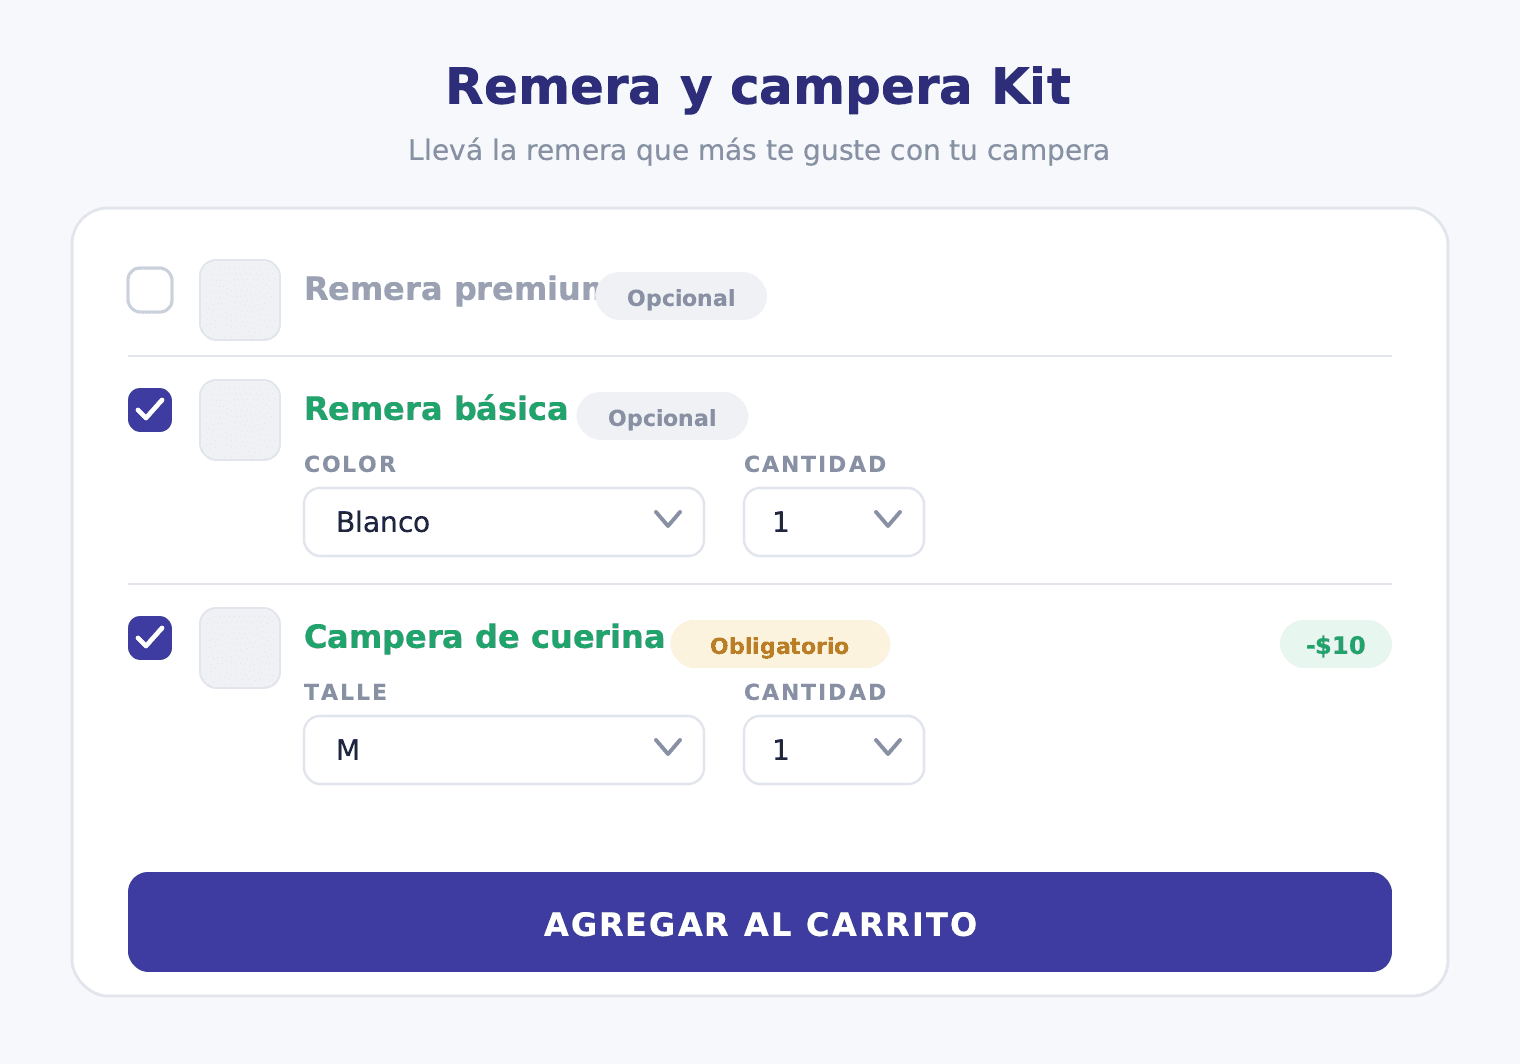
Consider a clothing store: you sell a jacket and want the shopper to add the shirt they like most. A Legacy bundle forces everyone to take exactly the same combination. Combos works well when the structure is fixed and only the variant changes (size, color). But what happens when the value is in letting the shopper decide which pieces of the set to include?
That is where a Kit comes in. A Kit does not fix which items the shopper will take: it defines a possible set and the shopper chooses from within that set. You can have a jacket as a mandatory element and ten shirts as optional ones, with a per-item discount on each shirt the shopper decides to add. The choice is theirs, and the discount is the incentive to expand the purchase.
The result is a personalized shopping experience that a Legacy bundle or Combos cannot offer when the structure itself is what the customer wants to control.
How a Kit works
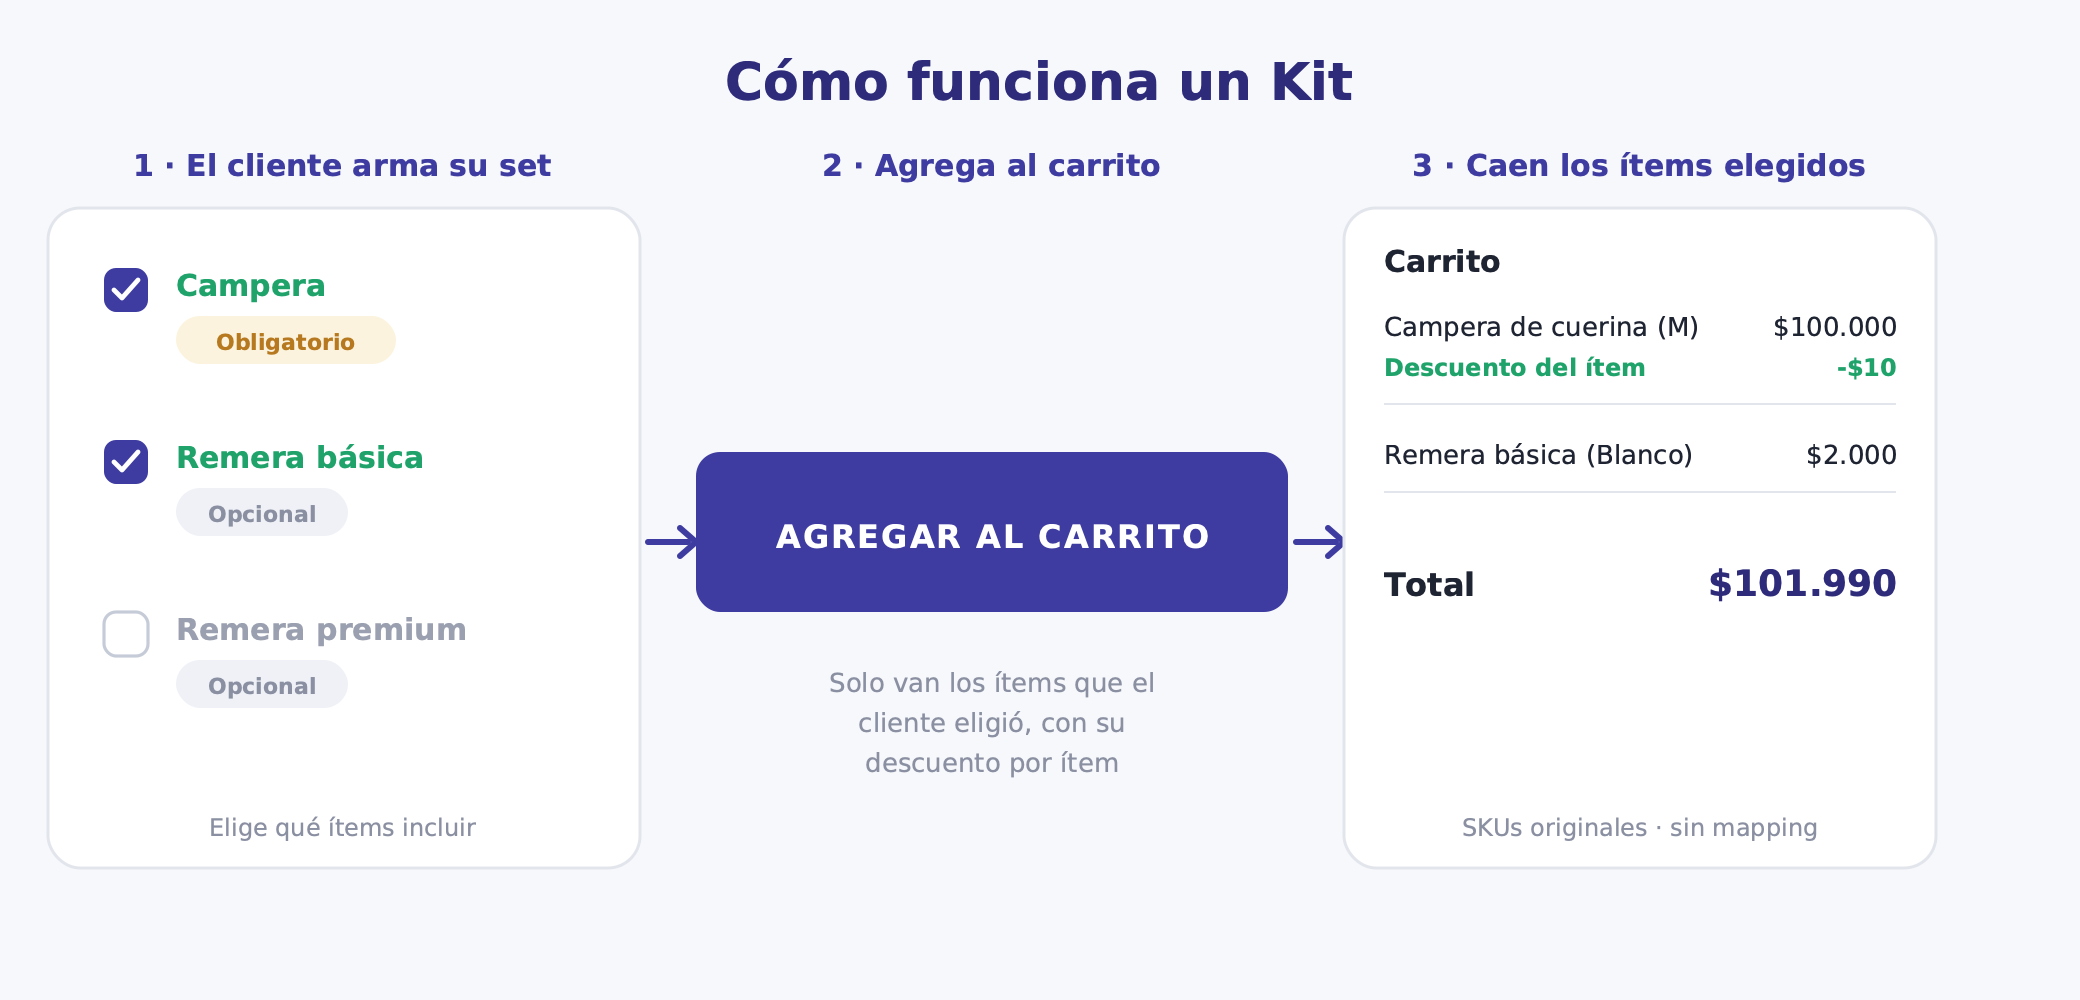
A Kit is made up of elements. Each element represents a product (or several eligible products) that the shopper can include or not. Here is how each element is configured:
Mandatory or optional. An element marked as mandatory must always be in the cart when the kit is added. An optional element the shopper adds only if they want to.
Minimum and maximum quantity. Each element has a quantity range: for example, "minimum 1, maximum 2" means the shopper can take one or two units of that item. A mandatory element with minimum 1 and maximum 1 is a fixed anchor in the kit.
Variant. Each element can have a fixed variant (always the same color, for example) or eligible variants: the shopper picks from the options you enable for that element (for example, sizes S, M, or L in red).
Per-item discount. Each element can have its own discount: none, a percentage, or a fixed amount. The discount is applied at checkout to the selected items.
In addition to elements, the Kit has selection limits: a minimum number of items (how many distinct items must go to the cart for the kit to be valid) and a maximum number of items (how many items receive the discount at most). This lets you say, for example, "choose between 2 and 4 items from the set" regardless of how many optional elements you configured.
When the shopper finishes building their selection and adds the kit to the cart, what arrives in the cart are the original SKUs of the selected products, with the per-item discount applied at checkout. The landing product is just the storefront entry point: it does not create a new SKU or a combined product. Each item goes to the cart with its real SKU.
How it differs from a Legacy bundle and from Combos
A Legacy bundle is a product unit that syncs stock with its components. The shopper buys the bundle: they choose nothing. It works well when every shopper takes exactly the same thing. It has a TiendaNube technical limit: 3 variant axes and approximately 1,000 combinations. It creates a new combo SKU.
Combos has a fixed product structure, but the shopper chooses the variant of each item (size, color, flavor). Individual SKUs go to the cart with a bundle-level discount line. There is no variant limit, making it ideal for fashion (size x color) or supplements (flavor x size).
A Kit goes a step further: the shopper not only chooses variants, they choose which items to include. The structure is not fixed: it is a possible set with optional and mandatory elements. The discount is per item, not per bundle. Original SKUs go to the cart.
For a detailed comparison of all bundle types available in Bundle, see Combos, Kit or By quantity: which bundle type to use.
When to use a Kit
Main product + optional extras
This is the clearest use case: the shopper definitely wants the anchor item, and the extras are options they can add at a discount. "Take the shirt you like most with your jacket" is exactly this. The jacket is a mandatory element (qty 1–1), the shirts are optional (qty 0–1 or 0–2 each) with their own per-item discount.
Made-to-order set
The shopper builds their own set by choosing from a curated list. For example, "choose 3 books from this selection of 10." You configure 10 optional elements with qty 0–1 and selection limits of minimum 3, maximum 3. The shopper picks exactly 3 titles.
Gift builder
The customer assembles a gift box by choosing 4 out of 8 available products. Each product is an optional element with qty 0–1, selection limit minimum 4, maximum 4. The per-item discount makes assembling the box more attractive than buying the products individually.
Quantity control with a mandatory anchor
A main item (qty 1–1, mandatory) plus extras where the shopper can add up to 2 units of each. The maximum selection limit caps how many discounted items the shopper can accumulate in a single purchase, protecting the margin.
"Take the one you like most"
When you have several similar products and want the shopper to choose one at the bundle price. A single required element with multiple eligible variants: the shopper picks the variant they want and gets that item at a discount.
Per-item discounts and selection limits
Each element in the kit can have its own discount, independent of the others. This gives you granularity: the anchor item may have no discount (it is already included in the kit; the incentive is the combination), while optional extras can have a 15% or 20% discount to motivate the add-on.
The available per-item discounts are three: none, a percentage of the original price, or a fixed amount in your store's currency.
Selection limits work at the kit level. The minimum items setting defines how many distinct elements the shopper must select for the purchase to be valid. The maximum items setting defines how many elements receive the discount: if the shopper adds more, the extra items are charged at the regular price. This protects you from bundles that become unlimited discounts when the shopper adds many optional items.
Operations and SKUs: what arrives in the order
When a shopper completes a Kit, the cart receives the original SKUs of each selected product. No new product is created, no combo SKU, no special inventory entry. The per-item discount is applied at checkout as a price adjustment line.
This means your fulfillment system, warehouse, or accounting tools see exactly the same SKUs they would see in an individual sale. No mappings, no virtual products, no additional reconciliations. The same advantage that Combos has over a Legacy bundle.
The landing product that Bundle creates in TiendaNube is only the entry point: it has its own product ID, handle, and promo ID, and it is what the shopper sees in your store. When the kit is paused, that landing product returns a 404. When it is active, it shows the item selector. In no case does that product go to the cart: what goes to the cart are the real SKUs of the selected products.
How to create a Kit in Bundle
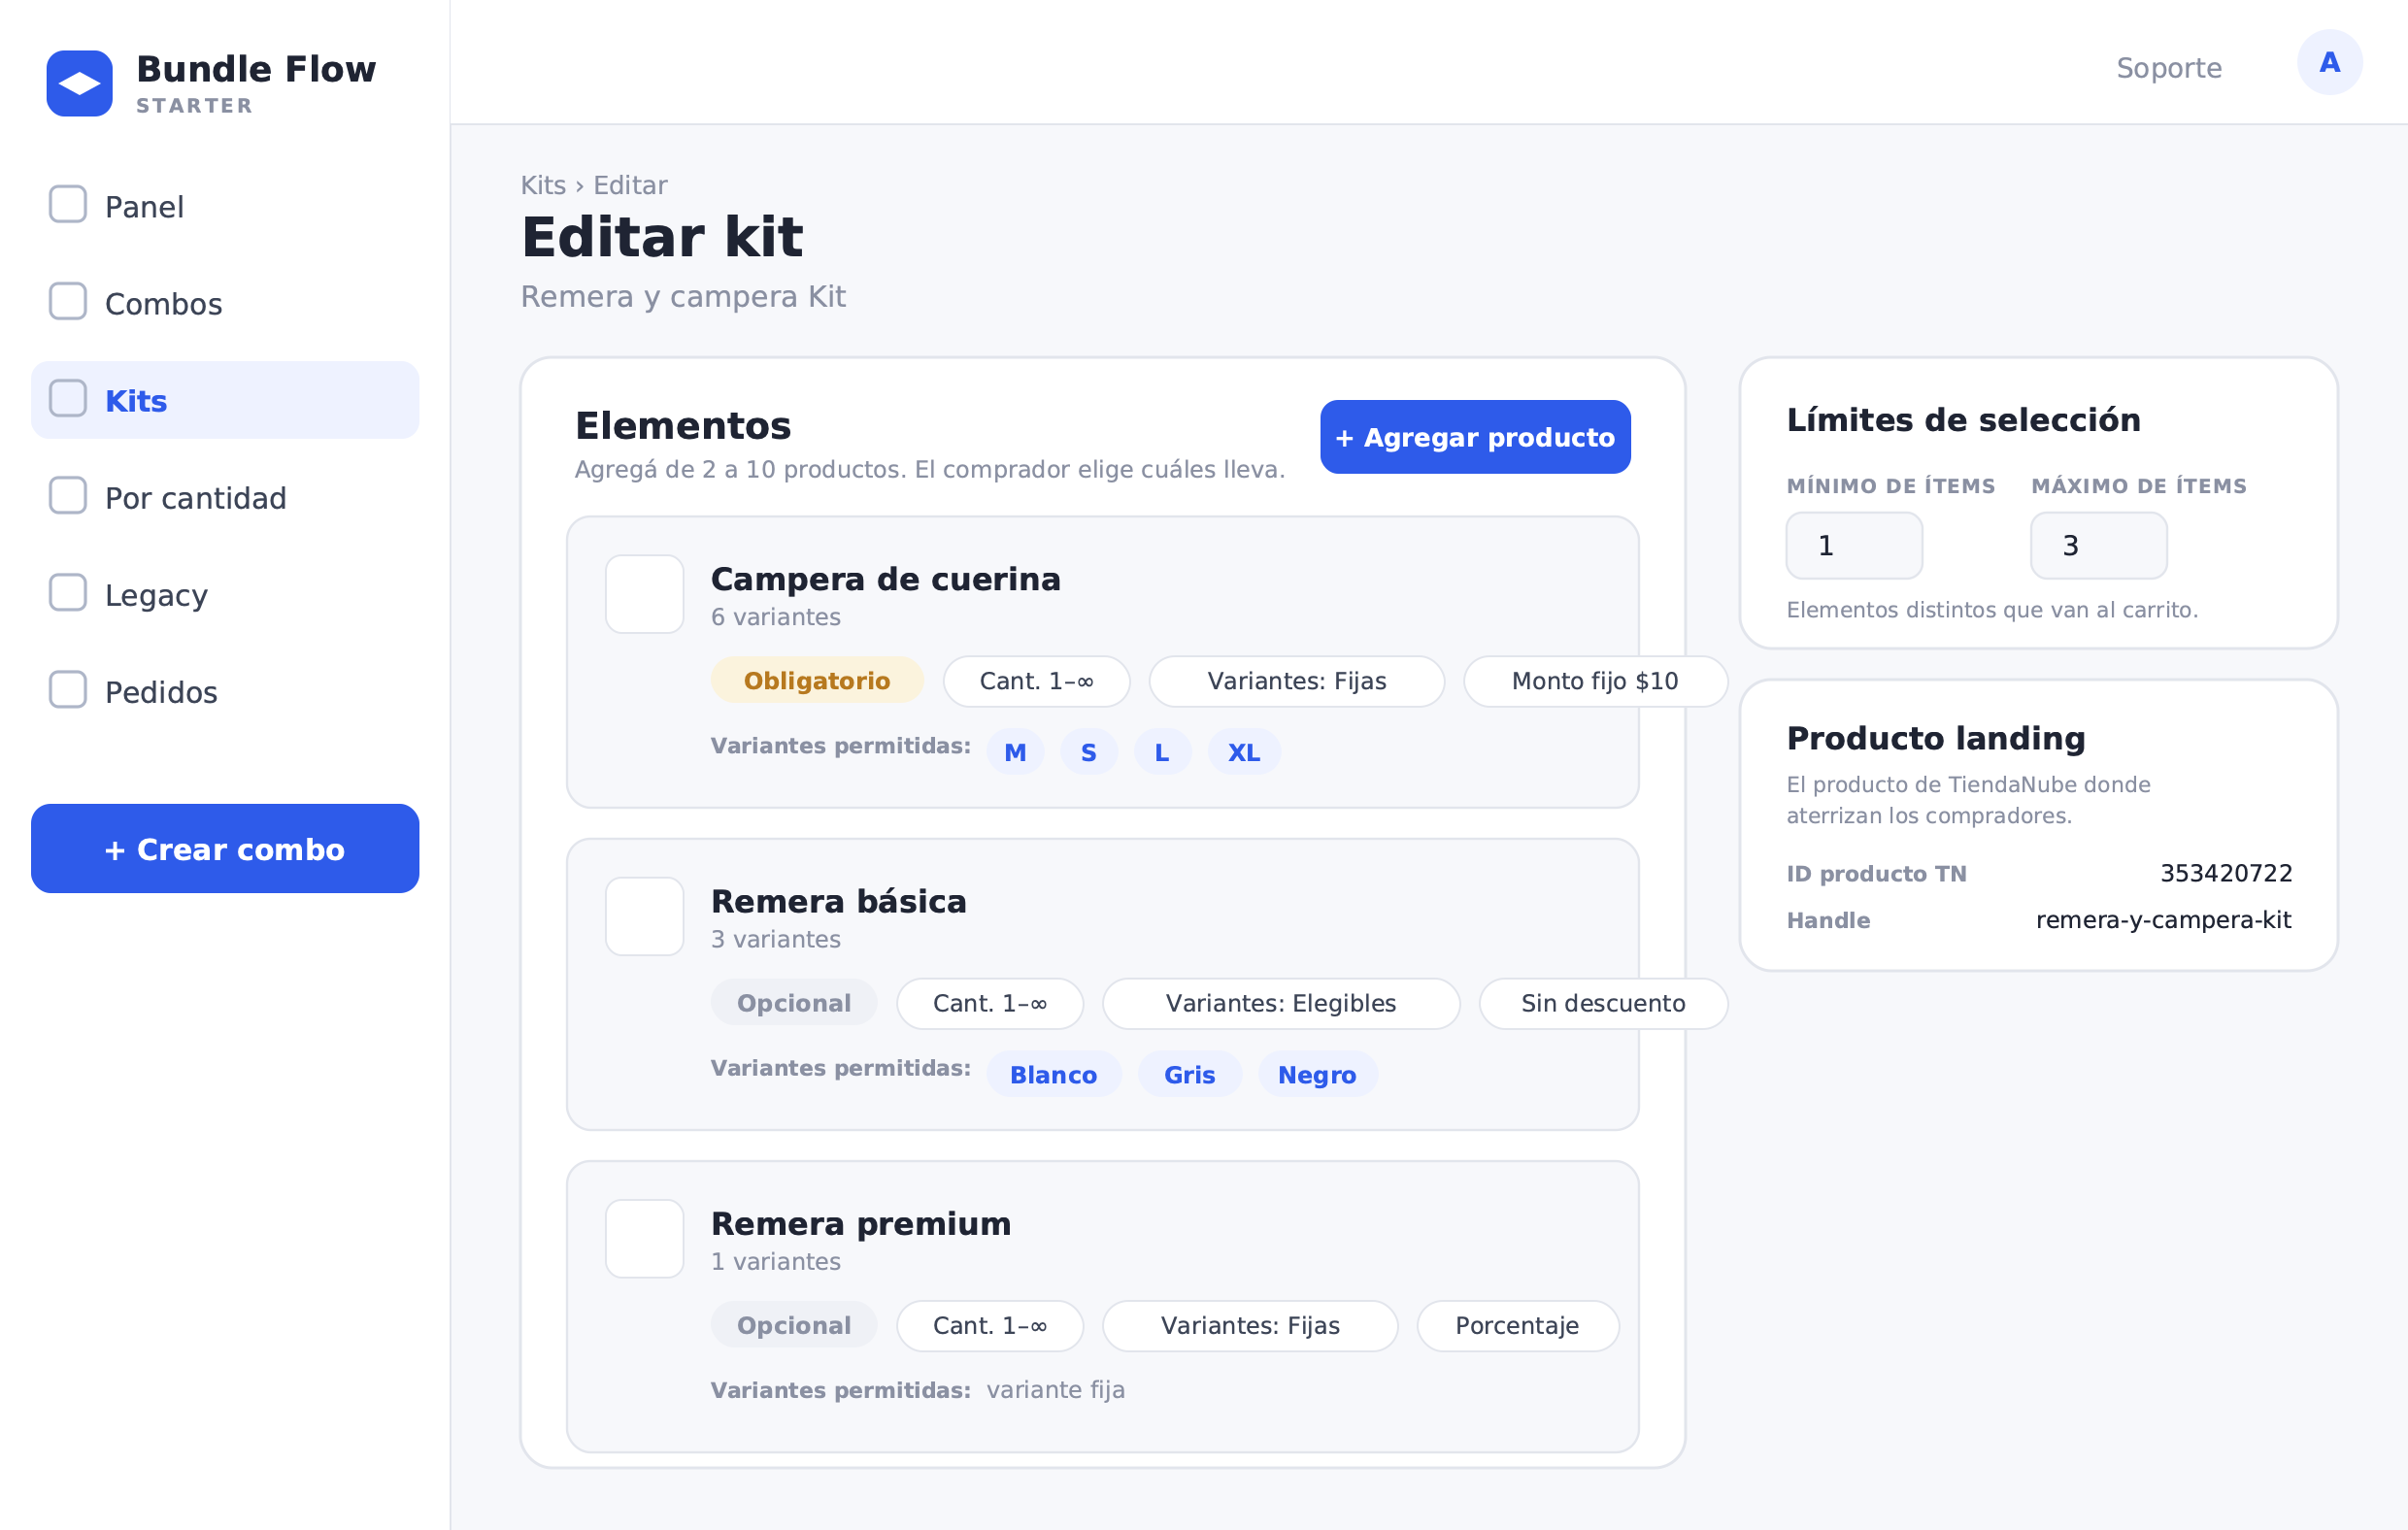
Follow these steps from the Bundle admin panel:
1. Go to Kits. In the Bundle menu, open Kits and select "Create kit." If your plan allows, you can also go to Create bundle and choose the Kit type. Kits are available depending on your subscribed plan.
2. Fill in the details. Kit name and description: this is what the shopper will see in the store. Use the description to communicate the value of the set: "Choose the shirt you like most to go with your jacket."
3. Add the elements. Use "Add product" to include each element in the kit. For each one, configure:
- The Mandatory / Optional toggle.
- The minimum and maximum quantity of units.
- Variants: fixed (always the same) or eligible (the shopper chooses from the ones you enable).
- The per-item discount: None, Percentage, or Fixed amount.
You can add between 2 and 10 elements per kit.
4. Configure the selection limits. Set the minimum items (how many distinct elements the shopper must select) and the maximum items (how many receive the discount). These limits apply across the full set of elements.
5. Adjust the general settings. Kit priority (if you have several bundles that apply to the same product) and free shipping (if you want to enable it for this kit).
6. The landing product. Bundle automatically creates a product in TiendaNube that serves as the entry point for the kit. You will see the product ID, handle, and promo ID in the admin. That product is what appears in your store with the item selector.
7. Publish and lifecycle. Save your changes. The kit can be active, paused, or archived. While paused, the landing product returns a 404. Archiving removes it from the store and it cannot be reactivated.
What to measure
Once your Kit is active, pay attention to these metrics to understand whether it is working as intended:
- Inclusion rate per optional element: how many times each optional extra is added relative to total kit purchases. This tells you which extras are attractive and which are not convincing.
- Average items per kit: how many elements the shopper selects on average. If the average equals the minimum, the extras incentive is not working.
- Revenue per kit vs. revenue from the landing product alone: whether the kit raises the average ticket compared to buying only the anchor item.
- Most frequent combinations: which sets of elements shoppers choose most often. This can inform future Legacy bundle or Combos setups.
When to choose a Kit
A Kit is the right choice when the value of the offer is in letting the shopper curate their own selection from a curated set. Not when the structure is fixed (that is what Combos is for), and not when everyone takes exactly the same thing (that is what a Legacy bundle is for).
The per-item discount gives each element its own incentive. The selection limits keep the economics in check. And the fact that original SKUs go to the cart means operations are clean from the first order.
If you build sets with mandatory and optional products, if you want the shopper to build their own gift set, or if you want the customer to choose the extras that interest them most with a clear incentive, the Kit is the bundle type you need.